Hi Readers,
Thanks for the great response to this series.
In this article, we will do customization in the Microsoft Base Application Extension that we setup in the Last Article.
For Reading all Previous Articles in this series Refer here.
#MSDYN365BC #BC2019Wave2
For other Articles in this series Refer Here.
** Again as I said earlier, This customization is just for Demo. This can be easily converted to an AL Extension. I am not suggesting to use this approach, I am just using this for this demo.
What AL Files I am Modifying -
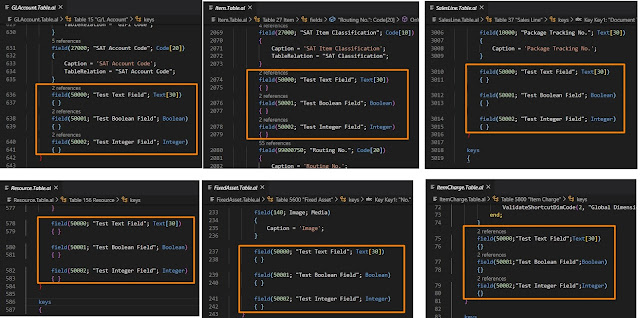
Tables - GLAccount.Table.al, Item.Table.al, SalesLine.Table.al, Resource.Table.al, FixedAsset.Table.al & ItemCharge.Table.al.
Fields - Test Text Field, Test Boolean Fields, Test Integer Field.
2. Adding those fields in Master and Transaction Pages AL Files Below with Three Fields.
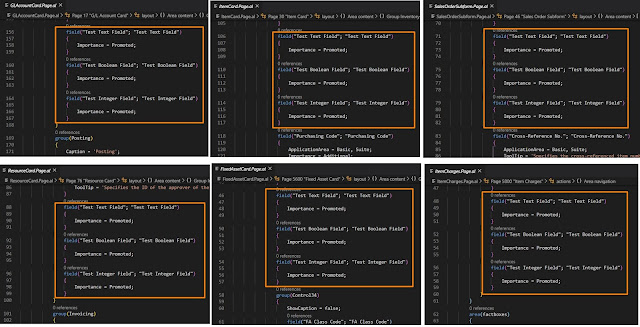
Pages - GLAccountCard.Page.al, ItemCard.Page.al, SalesOrderSubform.Page.al, ResourceCard.Page.al, FixedAssetCard.Page.al & ItemCharges.Page.al.
Fields - Test Text Field, Test Boolean Fields, Test Integer Field.
3. Also Added Some Custom Code in Sales Line Table.
Functions - CopyFromGLAccount, CopyFromResource, CopyFromFixedAsset, CopyFromItem & CopyFromItemCharge.
The Idea with these custom Lines is to copy those three fields values from Master Table to Transaction Table.
4. Next, let's Build our Custom Base App, For those, we will have to follow the following steps.
6. Build Application and Save.
The Last thing that we are doing today is building the Custom Base Application and Saving this app for the next article.
We will use that app for our Data Upgrade instead of Microsoft Base Extension.
In the Next Article, we will discuss Data Upgrade Process.
Stay tuned for more.
Hope you find it useful.
Let me know your views as a comment on this article.
Regards,
Saurav Dhyani
www.sauravdhyani.com
Thanks for the great response to this series.
In this article, we will do customization in the Microsoft Base Application Extension that we setup in the Last Article.
For Reading all Previous Articles in this series Refer here.
#MSDYN365BC #BC2019Wave2
For other Articles in this series Refer Here.
** Again as I said earlier, This customization is just for Demo. This can be easily converted to an AL Extension. I am not suggesting to use this approach, I am just using this for this demo.
What AL Files I am Modifying -
1. Adding a field in Master & Transaction Tables AL Files listed Below with Three Fields.
Tables - GLAccount.Table.al, Item.Table.al, SalesLine.Table.al, Resource.Table.al, FixedAsset.Table.al & ItemCharge.Table.al.
Fields - Test Text Field, Test Boolean Fields, Test Integer Field.
2. Adding those fields in Master and Transaction Pages AL Files Below with Three Fields.
Pages - GLAccountCard.Page.al, ItemCard.Page.al, SalesOrderSubform.Page.al, ResourceCard.Page.al, FixedAssetCard.Page.al & ItemCharges.Page.al.
Fields - Test Text Field, Test Boolean Fields, Test Integer Field.
3. Also Added Some Custom Code in Sales Line Table.
Functions - CopyFromGLAccount, CopyFromResource, CopyFromFixedAsset, CopyFromItem & CopyFromItemCharge.
The Idea with these custom Lines is to copy those three fields values from Master Table to Transaction Table.
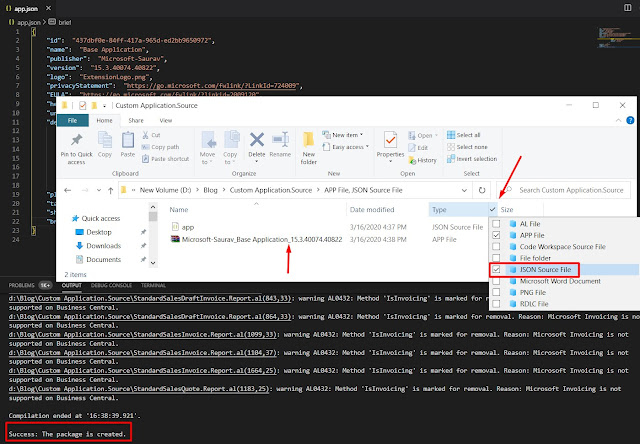
4. Next, let's Build our Custom Base App, For those, we will have to follow the following steps.
- Update Extension Details.
- Build the Application.
- Search and open app.json.
- For my visibility and easy identification, I would like to update the publisher to Microsoft-Saurav.
- Not Mandatory - Just changing it to easily identify that Extension is Modified.
6. Build Application and Save.
The Last thing that we are doing today is building the Custom Base Application and Saving this app for the next article.
- Use Ctrl+Shift+B to Build Application.
- Then Open the folder and Save Modified Base Application. We will use this app with our upgrade to Business Central 15.
We will use that app for our Data Upgrade instead of Microsoft Base Extension.
In the Next Article, we will discuss Data Upgrade Process.
Stay tuned for more.
Hope you find it useful.
Let me know your views as a comment on this article.
Regards,
Saurav Dhyani
www.sauravdhyani.com


Comments
Post a Comment